Tin Tức
Buy VPS Hong Kong, VPS Taiwan, VPS Vietnam - Asisa VPS Unlimited bandwidth at unbelievably low prices. Cho thuê VPS Hong Kong, Taiwan, Vietnam giá tốt rẻ nhất, không giới hạn băng thông, IP Hong Kong, IP China, IP Viet Nam
Kích hoạt HTTP/2 với Nginx

Chỉ với một vài thao tác nhỏ, bạn có thể tăng tốc website lên nhiều lần so với hiện tại. Tại sao không thử nhỉ?
Trong bài viết trước mình đã giới thiệu về HTTP/2 và những lợi ích mà nó mang lại. Ngay từ bây giờ, bạn đã có thể áp dụng giao thức HTTP/2 cho website của mình rồi đó.
Một điều lưu ý nhỏ là HTTP/2 chỉ hoạt động khi cả web server và trình duyệt cùng hỗ trợ giao thức, nếu không kết nối sẽ tự động quay lại HTTP/1.1.
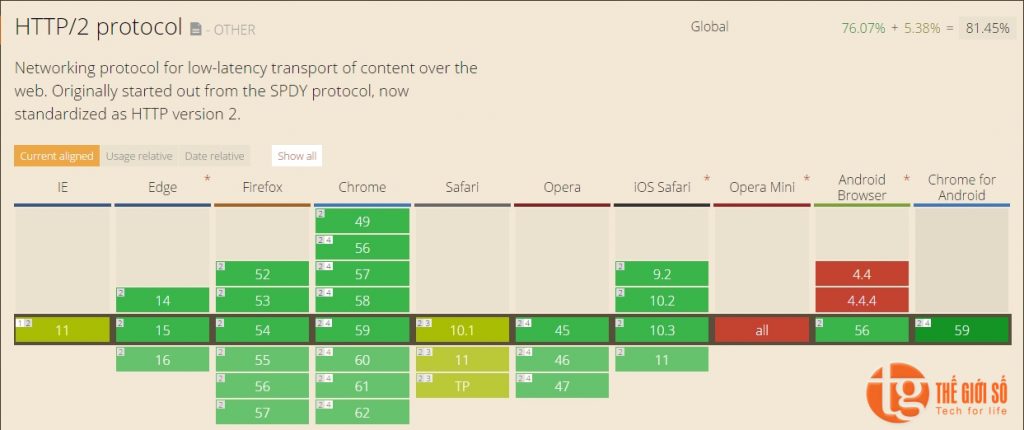
– Về phương diện trình duyệt, các trình duyệt phổ biến như Chrome, Firefox, Edge, Safari… đều đã hỗ trợ giao thức HTTP/2 (kiểm tra tại CanIUse). Tuy vậy, tất cả lại chỉ hỗ trợ HTTP/2 qua kết nối SSL/TLS.
Như vậy, để tận hưởng lợi ích của HTTP/2, website cần phải sử dụng SSL.
– Về phương diện Hosting/Server, ngoài SSL, bạn cần đảm bảo hệ thống webserver đã thiết lập HTTP/2 và hỗ trợ tương tác bằng ALPN (Application-Layer Protocol Negotiation)
Nếu bạn dùng Hosting, hãy liên hệ hỏi nhà cung cấp cho chắc chắn. Với Thế Giới Số thì yên tâm dùng mà không cần hỏi.
Nếu bạn dùng VPS/Cloud Server, hãy kích hoạt SSL, HTTP/2 cho webserver thông qua các giao thức trực tiếp/module cài đặt (cụ thể tùy vào từng loại webserver). Để như vậy, VPS bạn cần có OpenSSL v1.0.2 trở lên. Kiểm tra
# openssl version
OpenSSL 1.0.1e-fips 11 Feb 2013
Bài viết này mình sẽ hướng dẫn thiết lập HTTP/2 trên VPS sử dụng Nginx webserver (ví dụ TGS, Centmin Mod…) tương thích với các trình duyệt phổ biến hiện nay. Bạn cần:
- Biên dịch mã nguồn Nginx tích hợp OpenSSL phiên bản 1.0.2 trở lên (làm 1 lần duy nhất)
- Cấu hình SSL HTTP/2 trong Nginx Conf
– Nếu đã cài đặt HTTPS theo hướng dẫn cài đặt chứng chỉ SSL hoặc Let’s Encrypt thì chỉ cần biên dịch lại mã nguồn Nginx (bước 1) là đã thiết lập được HTTP/2.
1. Tích hợp OpenSSL vào Nginx
Bạn cần tích hợp OpenSSL bằng cách biên dịch lại mã nguồn Nginx. TGS lựa chọn phiên bản mới nhất OpenSSL v1.1.0g để tích hợp vào Nginx 1.12.2. Tham khảo các phiên bản khác tại Nginx Download và OpenSSL Source.
– TGS sử dụng Nginx dòng Stable 1.12.x – không phải dòng Mainline 1.13.x.
– Đối với OpenSSL, có thể sử dụng phiên bản 1.0.2x hoặc dòng Stable 1.1.0x
– Các phiên bản đã test thành công: Nginx 1.12.1 + OpenSSL 1.1.0f, Nginx 1.12.2 + OpenSSL 1.1.0g
1.1. Chuẩn bị
– Kiểm tra thông tin Nginx. Thời điểm hiện tại, TGS sử dụng Nginx 1.12.1 tích hợp OpenSSL 1.0.1e (mặc định, ra đời từ năm 2013) cùng với các tham số Configure Arguments như phần bôi đỏ. Bạn sẽ cần copy lại các tham số này để tiến hành biên dịch lại Nginx ở bước sau.
# nginx -V
nginx version: nginx/1.12.1
built by gcc 4.4.7 20120313 (Red Hat 4.4.7-18) (GCC)
built with OpenSSL 1.0.1e-fips 11 Feb 2013
TLS SNI support enabled
configure arguments: --prefix=/etc/nginx --sbin-path=/usr/sbin/nginx --modules-path=/usr/lib64/nginx/modules --conf-path=/etc/nginx/nginx.conf --error-log-path=/var/log/nginx/error.log --http-log-path=/var/log/nginx/access.log --pid-path=/var/run/nginx.pid --lock-path=/var/run/nginx.lock --http-client-body-temp-path=/var/cache/nginx/client_temp --http-proxy-temp-path=/var/cache/nginx/proxy_temp --http-fastcgi-temp-path=/var/cache/nginx/fastcgi_temp --http-uwsgi-temp-path=/var/cache/nginx/uwsgi_temp --http-scgi-temp-path=/var/cache/nginx/scgi_temp --user=nginx --group=nginx --with-compat --with-file-aio --with-threads --with-http_addition_module --with-http_auth_request_module --with-http_dav_module --with-http_flv_module --with-http_gunzip_module --with-http_gzip_static_module --with-http_mp4_module --with-http_random_index_module --with-http_realip_module --with-http_secure_link_module --with-http_slice_module --with-http_ssl_module --with-http_stub_status_module --with-http_sub_module --with-http_v2_module --with-mail --with-mail_ssl_module --with-stream --with-stream_realip_module --with-stream_ssl_module --with-stream_ssl_preread_module --with-cc-opt='-O2 -g -pipe -Wall -Wp,-D_FORTIFY_SOURCE=2 -fexceptions -fstack-protector --param=ssp-buffer-size=4 -m64 -mtune=generic -fPIC' --with-ld-opt='-Wl,-z,relro -Wl,-z,now -pie'
– Tải và cài đặt các thành phần cần thiết: mã nguồn Nginx 1.12.2, mã nguồn OpenSSL 1.1.0g cùng các trình biên dịch.
# yum install gcc-c++ pcre-devel zlib-devel epel-release -y
# cd /usr/local/src
# wget http://nginx.org/download/nginx-1.12.2.tar.gz && tar -xzvf nginx-1.12.2.tar.gz
# wget https://www.openssl.org/source/openssl-1.1.0g.tar.gz && tar -xzvf openssl-1.1.0g.tar.gz
1.2. Biên dịch Nginx
– Truy cập thư mục Nginx vừa tải để cấu hình mã nguồn với lệnh ./configure cùng toàn bộ tham số Nginx ban đầu (đề cập bước 1.1) và thêm vào --with-openssl=/usr/local/src/openssl-1.1.0g
Lưu ý: Để biên dịch, bạn cần 512MB RAM trở lên (bao gồm cả Swap)
# cd nginx-1.12.2
# ./configure --prefix=/etc/nginx --sbin-path=/usr/sbin/nginx --modules-path=/usr/lib64/nginx/modules --conf-path=/etc/nginx/nginx.conf --error-log-path=/var/log/nginx/error.log --http-log-path=/var/log/nginx/access.log --pid-path=/var/run/nginx.pid --lock-path=/var/run/nginx.lock --http-client-body-temp-path=/var/cache/nginx/client_temp --http-proxy-temp-path=/var/cache/nginx/proxy_temp --http-fastcgi-temp-path=/var/cache/nginx/fastcgi_temp --http-uwsgi-temp-path=/var/cache/nginx/uwsgi_temp --http-scgi-temp-path=/var/cache/nginx/scgi_temp --user=nginx --group=nginx --with-compat --with-file-aio --with-threads --with-http_addition_module --with-http_auth_request_module --with-http_dav_module --with-http_flv_module --with-http_gunzip_module --with-http_gzip_static_module --with-http_mp4_module --with-http_random_index_module --with-http_realip_module --with-http_secure_link_module --with-http_slice_module --with-http_ssl_module --with-http_stub_status_module --with-http_sub_module --with-http_v2_module --with-mail --with-mail_ssl_module --with-stream --with-stream_realip_module --with-stream_ssl_module --with-stream_ssl_preread_module --with-cc-opt='-O2 -g -pipe -Wall -Wp,-D_FORTIFY_SOURCE=2 -fexceptions -fstack-protector --param=ssp-buffer-size=4 -m64 -mtune=generic -fPIC' --with-ld-opt='-Wl,-z,relro -Wl,-z,now -pie' --with-openssl=/usr/local/src/openssl-1.1.0g
Kết quả hiển thị như dưới là thành công:
Configuration summary
  + using threads
  + using system PCRE library
  + using OpenSSL library: /usr/local/src/openssl-1.1.0g
  + using system zlib library

  nginx path prefix: "/etc/nginx"
  nginx binary file: "/usr/sbin/nginx"
  nginx modules path: "/usr/lib64/nginx/modules"
  nginx configuration prefix: "/etc/nginx"
  nginx configuration file: "/etc/nginx/nginx.conf"
  nginx pid file: "/var/run/nginx.pid"
  nginx error log file: "/var/log/nginx/error.log"
  nginx http access log file: "/var/log/nginx/access.log"
  nginx http client request body temporary files: "/var/cache/nginx/client_temp"
  nginx http proxy temporary files: "/var/cache/nginx/proxy_temp"
  nginx http fastcgi temporary files: "/var/cache/nginx/fastcgi_temp"
  nginx http uwsgi temporary files: "/var/cache/nginx/uwsgi_temp"
  nginx http scgi temporary files: "/var/cache/nginx/scgi_temp"
– Chạy lệnh phía dưới để tiến hành compile Nginx.
# make
Đợi tầm 3-5 phút để tiến trình thành công là bạn có thể sử dụng bộ Nginx đã được biên dịch thủ công để làm Webserver.
1.3. Thay thế Nginx
– Tiến hành thay thế Nginx trên VPS bằng Nginx vừa được biên dịch lại:
# mv /usr/sbin/nginx /usr/sbin/nginx.bak
# cp objs/nginx /usr/sbin/nginx
# service nginx restart
– Kiểm tra lại nếu thấy thông tin như bên dưới là thành công.
# nginx -V
nginx version: nginx/1.12.2
built by gcc 4.8.5 20150623 (Red Hat 4.8.5-16) (GCC)
built with OpenSSL 1.1.0g  2 Nov 2017
TLS SNI support enabled
configure arguments: --prefix=/etc/nginx --sbin-path=/usr/sbin/nginx --modules-path=/usr/lib64/nginx/modules --conf-path=/etc/nginx/nginx.conf --error-log-path=/var/log/nginx/error.log --http-log-path=/var/log/nginx/access.log --pid-path=/var/run/nginx.pid --lock-path=/var/run/nginx.lock --http-client-body-temp-path=/var/cache/nginx/client_temp --http-proxy-temp-path=/var/cache/nginx/proxy_temp --http-fastcgi-temp-path=/var/cache/nginx/fastcgi_temp --http-uwsgi-temp-path=/var/cache/nginx/uwsgi_temp --http-scgi-temp-path=/var/cache/nginx/scgi_temp --user=nginx --group=nginx --with-compat --with-file-aio --with-threads --with-http_addition_module --with-http_auth_request_module --with-http_dav_module --with-http_flv_module --with-http_gunzip_module --with-http_gzip_static_module --with-http_mp4_module --with-http_random_index_module --with-http_realip_module --with-http_secure_link_module --with-http_slice_module --with-http_ssl_module --with-http_stub_status_module --with-http_sub_module --with-http_v2_module --with-mail --with-mail_ssl_module --with-stream --with-stream_realip_module --with-stream_ssl_module --with-stream_ssl_preread_module --with-cc-opt='-O2 -g -pipe -Wall -Wp,-D_FORTIFY_SOURCE=2 -fexceptions -fstack-protector-strong --param=ssp-buffer-size=4 -grecord-gcc-switches -m64 -mtune=generic -fPIC' --with-ld-opt='-Wl,-z,relro -Wl,-z,now -pie' --with-openssl=/usr/local/src/openssl-1.1.0g
2. Cấu hình SSL HTTP/2 trong Nginx Conf
Webserver Nginx trên hệ thống của bạn đã sẵn sàng thiết lập giao thức HTTP/2 giữa Server và Browser. Bạn cần kích hoạt giao thức HTTP2 và SSL trong cấu hình Nginx của mỗi site.
Bạn sửa cấu hình Nginx trong block server {…} như sau (chỉnh sửa đối với từng website trong hệ thống).
listen 443 ssl http2;
Cụ thể, bạn cấu hình như hướng dẫn cài đặt chứng chỉ SSL hoặc Let’s Encrypt
3. Kiểm tra
Để kiểm tra, các bạn sử dụng công cụ Developer Tools của trình duyệt hoặc kiểm tra qua website.
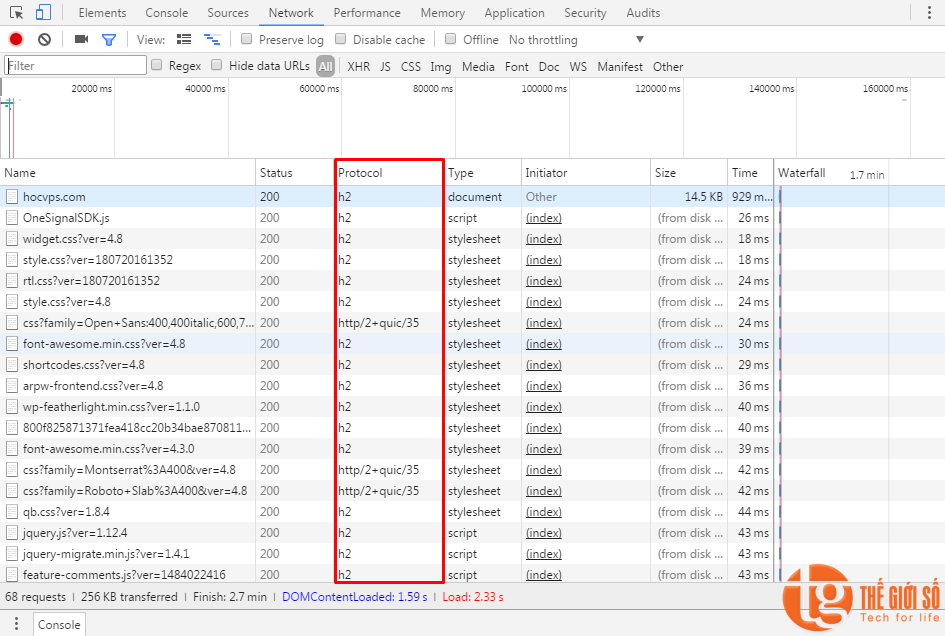
Kiểm tra trực tiếp các kết nối trình duyệt tới website với công cụ Developer Tools F12 (trình duyệt nào cũng có). Như bạn đã thấy, HocVPS đã dùng HTTP/2, thời gian load lần đầu homepage chỉ là 2.33s.
Lưu ý: Một số phần mềm Antivirus chặn HTTP/2 Protocol nên cần kiểm tra cả ở máy tính khác và check cả Firefox và Chrome.
- Với Chrome, nếu không thấy tab Protocol, bạn hãy nhấn chuột phải ở menu để kích hoạt.
- Với Firefox, các bạn check tab Header trong Network sẽ thấy Version: HTTP/2.0
Bên cạnh đó, bạn có thể kiếm tra qua website HTTP2.pro. Kết quả tích hợp HTTP/2 kèm ALPN là ok.
Hi vọng với bài viết hướng dẫn này, các bạn có thể kích hoạt kết nối giao thức HTTP/2 cho website của mình. Nếu có điều gì thắc mắc, hãy để lại comment bên dưới nhé.
Thế Giới Số chúc bạn cài đặt thành công và sử dụng VPS hiệu quả.


1 1 0 0 0 0
